Interactive Single-Video Mode
When you select a single video for translation, the software enters interactive mode. After each processing stage completes, an editing window pops up, allowing you to manually proofread and fine-tune the results before proceeding.
If you select multiple videos at once, they will be processed concurrently without pausing.
To disable the editing popups, go to Tools/Options → Advanced Options → Single-video interactive mode pause duration and set it to 0.
Stage 1: After Speech Recognition — Subtitle Editing Window
You can modify the recognition results, such as correcting typos.
Advanced: To edit subtitles with a third-party tool, click the "Open Subtitle Folder" button, locate the file named {language_code}.srt (e.g., zh-cn.srt for Chinese speech), edit it with an external editor, save your changes, then click "Don't Save, Just Continue" in the software. The modified file will be used going forward.
Stage 2: After Subtitle Translation — Voice Role Assignment Window
You can assign a dubbing voice to each speaker for multi-role dubbing, or assign a specific voice to individual subtitle lines.
Advanced: Same as above — click "Open Subtitle Folder" to find the translated SRT file (e.g., en.srt), edit it externally, save, then click "Don't Save, Just Continue".
Stage 3: After Dubbing — Proofread and Re-Dub Panel
After dubbing completes but before the final video is assembled, a panel appears showing each subtitle line alongside its dubbed audio.
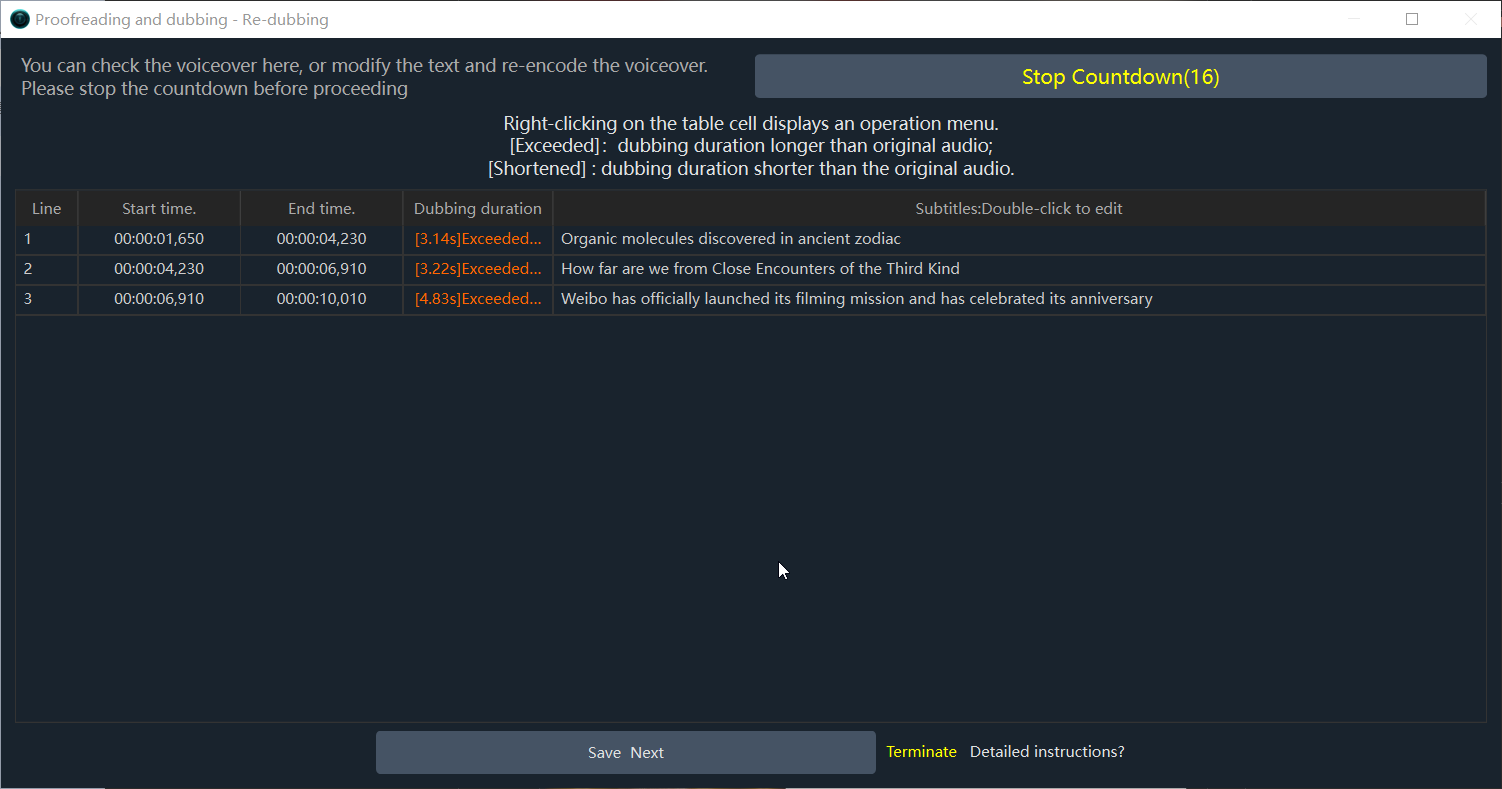
This panel is mainly for adjusting the timeline and re-dubbing specific lines. For example, some dubbing channels support adding emotion tags, pause markers, or tone controls — you can modify the subtitle text here to include those markers, then re-dub.
Note that text edits made here are only used for re-dubbing, not saved back to the subtitle file. This prevents control markers from polluting the SRT file.
Step 1: Stop the Countdown
When the panel opens, there is a yellow countdown button at the top (e.g., "Click to stop countdown (85)").
- Click this button immediately to pause the countdown, giving yourself time to review and make changes.
Step 2: Adjust Timing, Subtitles, Preview Audio, and Re-Dub
Each row represents one subtitle line, with 5 columns from left to right:
Time adjustments follow one principle: only use the gaps before/after to increase or decrease by 0.1s each time, without overlapping adjacent segments.
- Line number (e.g.,
[1]): The subtitle line index. - Start time: Double-click to decrease by 0.1s; Ctrl+Left to decrease by 0.1s; Ctrl+Right to increase by 0.1s.
- Right-click → "Start time -0.1s": Make this line start earlier (each time by 0.1s)
- Right-click → "Start time +0.1s": Make this line start later (each time by 0.1s)
- Note: Start time cannot be earlier than the previous line's end time
- End time: Double-click to increase by 0.1s; Ctrl+Left to decrease by 0.1s; Ctrl+Right to increase by 0.1s.
- Right-click → "End time -0.1s": Make this line end earlier (each time by 0.1s)
- Right-click → "End time +0.1s": Make this line end later (each time by 0.1s)
- Note: End time cannot be later than the next line's start time
- Dubbing duration: Right-click the cell to see "Preview" and "Re-Dub" buttons.
- x.xxs <Exceeded> x.xxs: Dubbing is too long for the subtitle's time slot. The software will automatically speed up playback. To avoid speed-up, extend the end time or shorten the text, then re-dub.
- x.xxs <Shortened> x.xxs: Dubbing is shorter than the subtitle duration — this is normal and will result in brief silence.
- Subtitle text: Double-click to edit directly; right-click for "Preview" and "Re-Dub" buttons.
- Re-Dub: After modifying text, you must click this button. The software will regenerate the audio based on the new text.
- Preview: Plays back the current subtitle's audio so you can check pronunciation and tone.
Stage 4: After STT Again — Subtitle Editing Window
If "STT again" is enabled, dubbing exists, and subtitles are not embedded as hard subs, this editing window will appear. You can fix typos here, then save and continue.
Notes
- Save and Continue: Confirms all edits, saves subtitle changes, and proceeds.
- Terminate This Task: Discards current changes and closes the window.
Tips:
- If the list is long, be patient when scrolling or clicking. The software has been optimized and should respond quickly.
- If a line's text is cleared, or the dubbing duration shows 0s, that line's audio will not be included in the final output.
Related Documentation
- Improving AI Translation Quality — Translation mode comparison and glossary usage
- Better Local LLM Translation — Local large model configuration guide
- Customizing AI Translation Prompts — Custom translation prompts
- Best Configuration for Video Translation — Optimal settings for each stage
- Why Do Blank Subtitle Lines Appear After Translation?