
Speech Recognition Channel: WhisperX API
What is this?
WhisperX is an extremely powerful speech recognition model that also supports speaker diarization. However, the official version only provides a command-line tool, which isn't beginner-friendly and lacks an API.
So we created an enhanced version: whisperx-api! Built on top of the original model, it adds:
- Local web interface — open a browser to use it, upload files for one-click transcription
- OpenAI-compatible API — can replace the original Whisper API and integrate directly with pyVideoTrans
- Speaker diarization — automatically identifies and labels different speakers (Speaker1, Speaker2...)
- One-click startup — using the
uvtool, environment setup is fully automatic
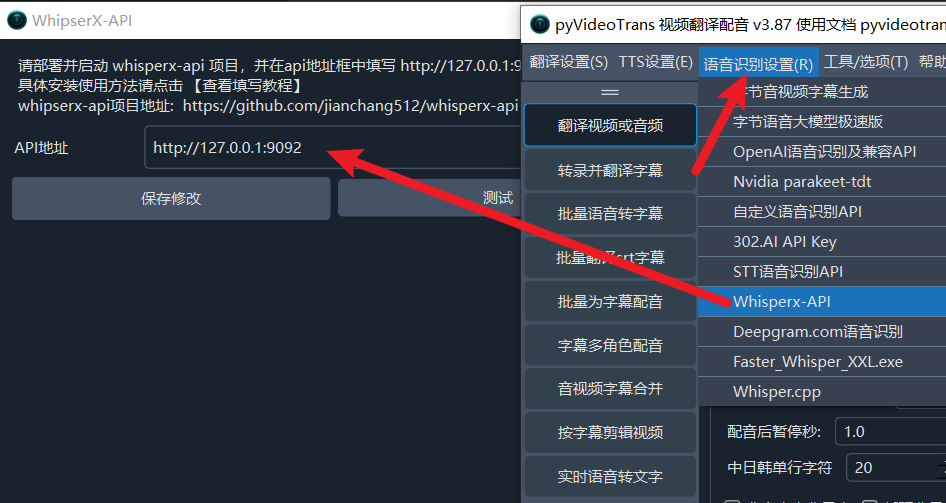
Using it in pyVideoTrans:
Use Cases
- Users who need speaker diarization (multi-person dialogue scenarios)
- Users seeking high recognition accuracy
- Users who want local operation without cloud APIs
- Users with an NVIDIA GPU for the best experience
Prerequisites
| Requirement | Details |
|---|---|
| uv | Ultra-fast Python package manager — one command to set up the environment |
| FFmpeg | Powerful audio/video processing tool for format conversion |
| NVIDIA GPU (recommended) | GPU provides tens of times faster speed; CPU mode is available but slower |
| HuggingFace account (for speaker diarization) | Need to accept model agreements and obtain an access token |
Tip: For detailed instructions on installing
uvandffmpeg, see: https://pyvideotrans.com/blog/uv-ffmpeg
Three Steps to Get Started
Step 1: Download the Project Code
Visit the project homepage: https://github.com/jianchang512/whisperx-api
Click the green "Code" → "Download ZIP" to download and extract the archive. Navigate to the folder containing app.py and index.html.
Clear the folder address bar, type cmd, and press Enter to open a terminal window.
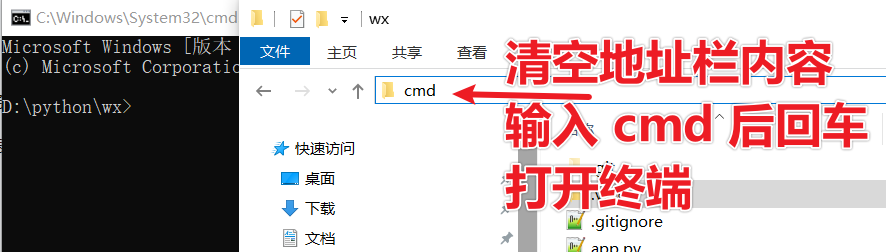
Step 2: Get the "Speaker Recognition" Model Access Token (Skip if not needed)
The speaker diarization model requires accepting its agreement before download. You need to "sign the agreement" on the Hugging Face website and obtain an access token. This step requires internet access — the site must be reachable.
1. Register and log in to Hugging Face
Visit: https://huggingface.co/
Create a free account and log in.
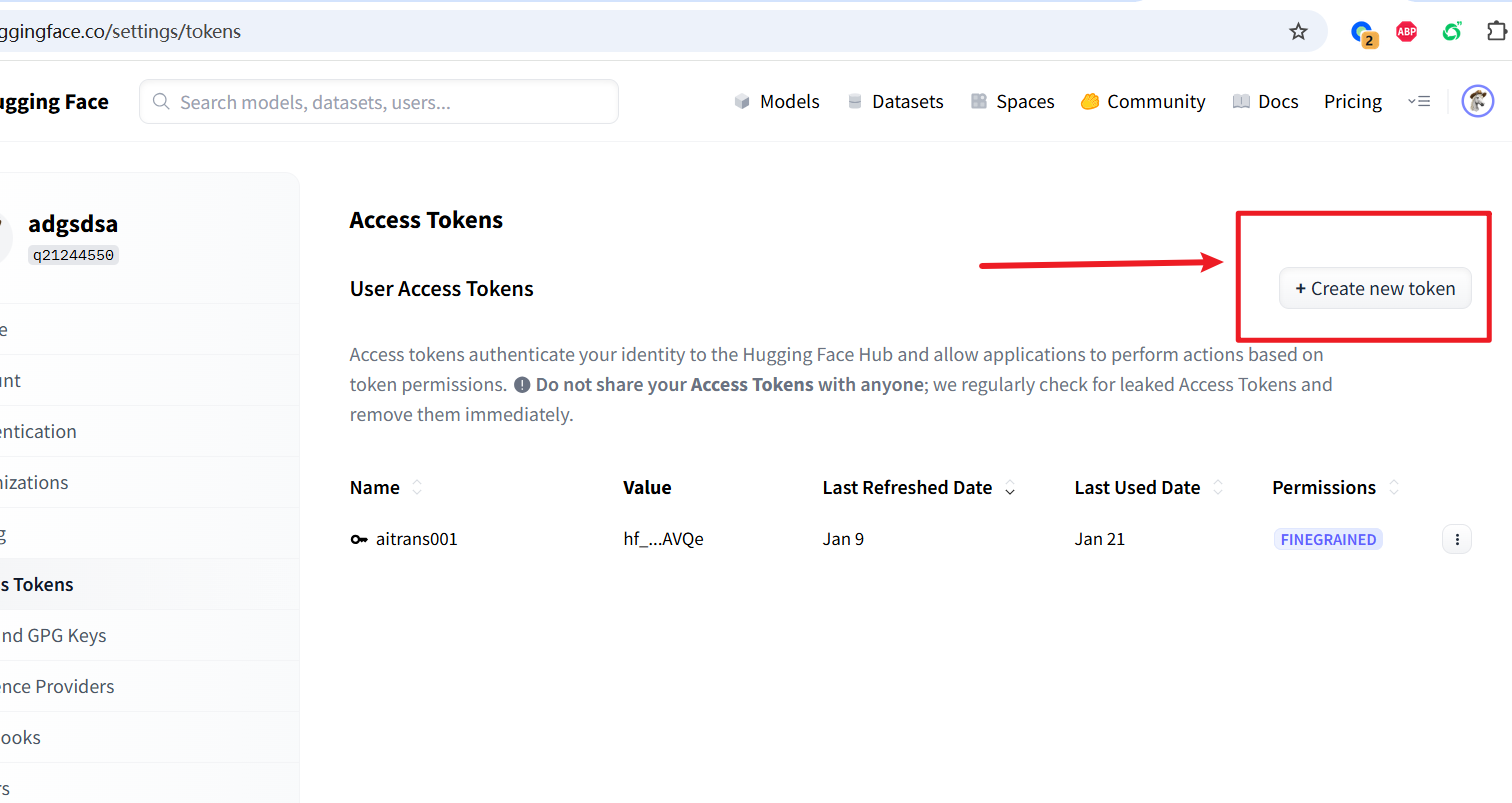
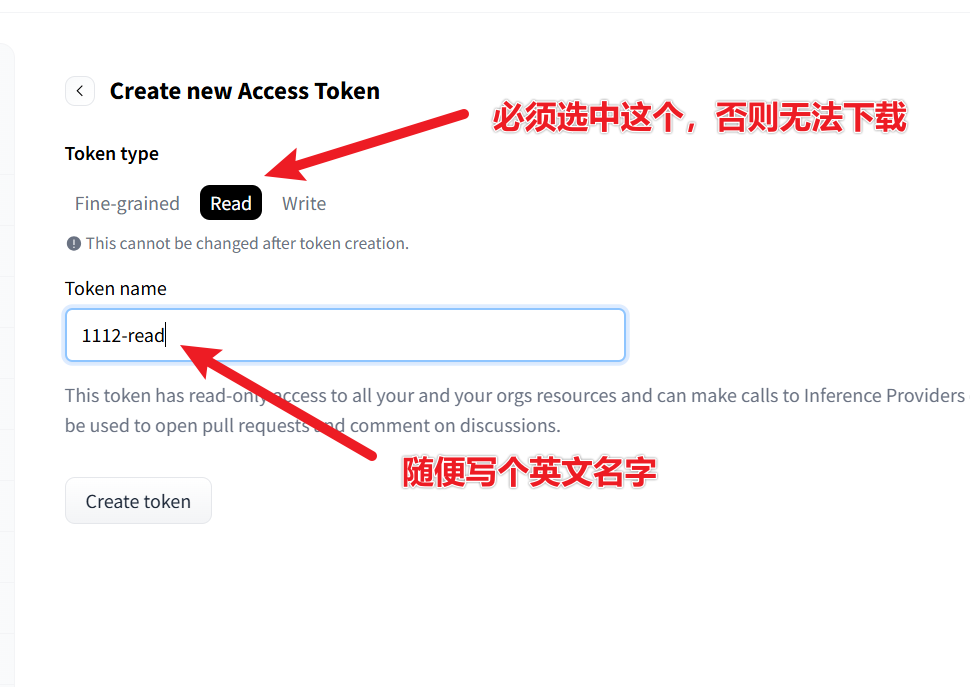
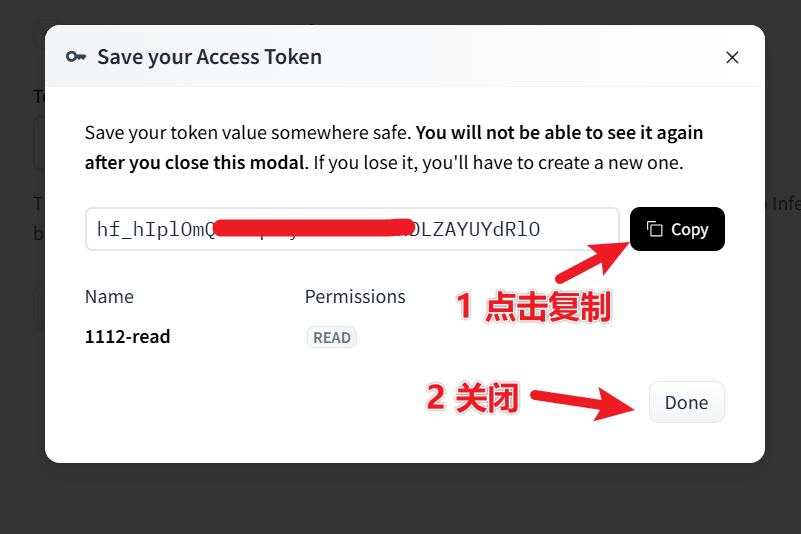
2. Create an access token
Visit: https://huggingface.co/settings/tokens
Click "New token" → select read permission → create and copy the token starting with hf_.
3. Accept the model usage agreements (must check!)
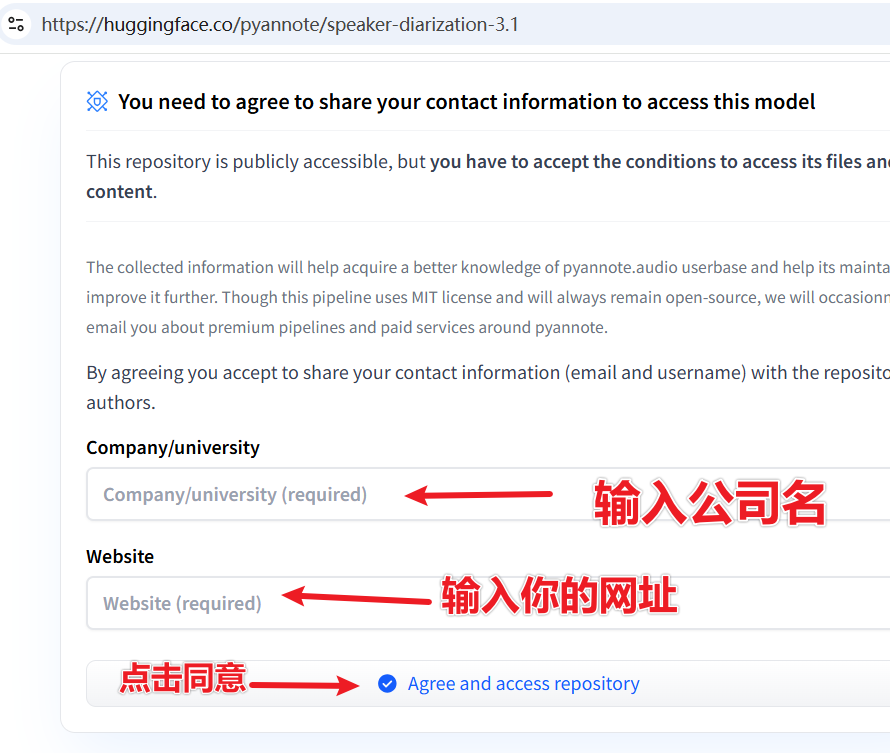
Visit the following two model pages and accept the agreements:
- https://huggingface.co/pyannote/speaker-diarization-3.1
- https://huggingface.co/pyannote/segmentation-3.0
On each page, fill in the two text fields and click the submit button.
4. Save the token
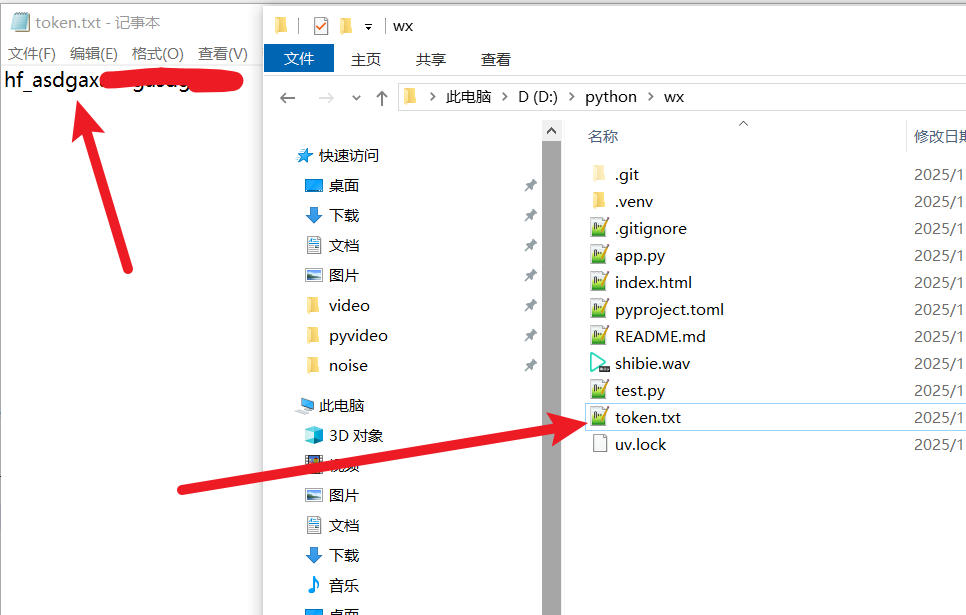
Go back to your whisperx-api project folder, create a new file called token.txt, paste the hf_ token into it, and save.
Step 3: One-Click Start!
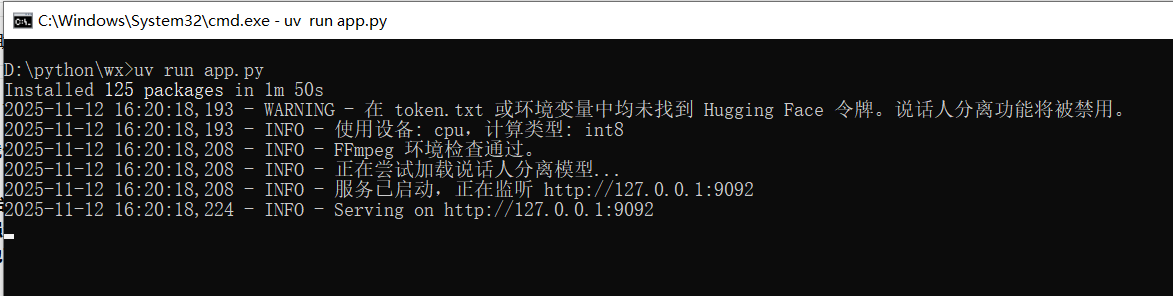
Make sure your terminal is still in the app.py directory, then run:
uv run app.pyOn the first run, it will take some time to install modules and dependencies — please wait patiently.
When you see output similar to the image below, the startup is successful:
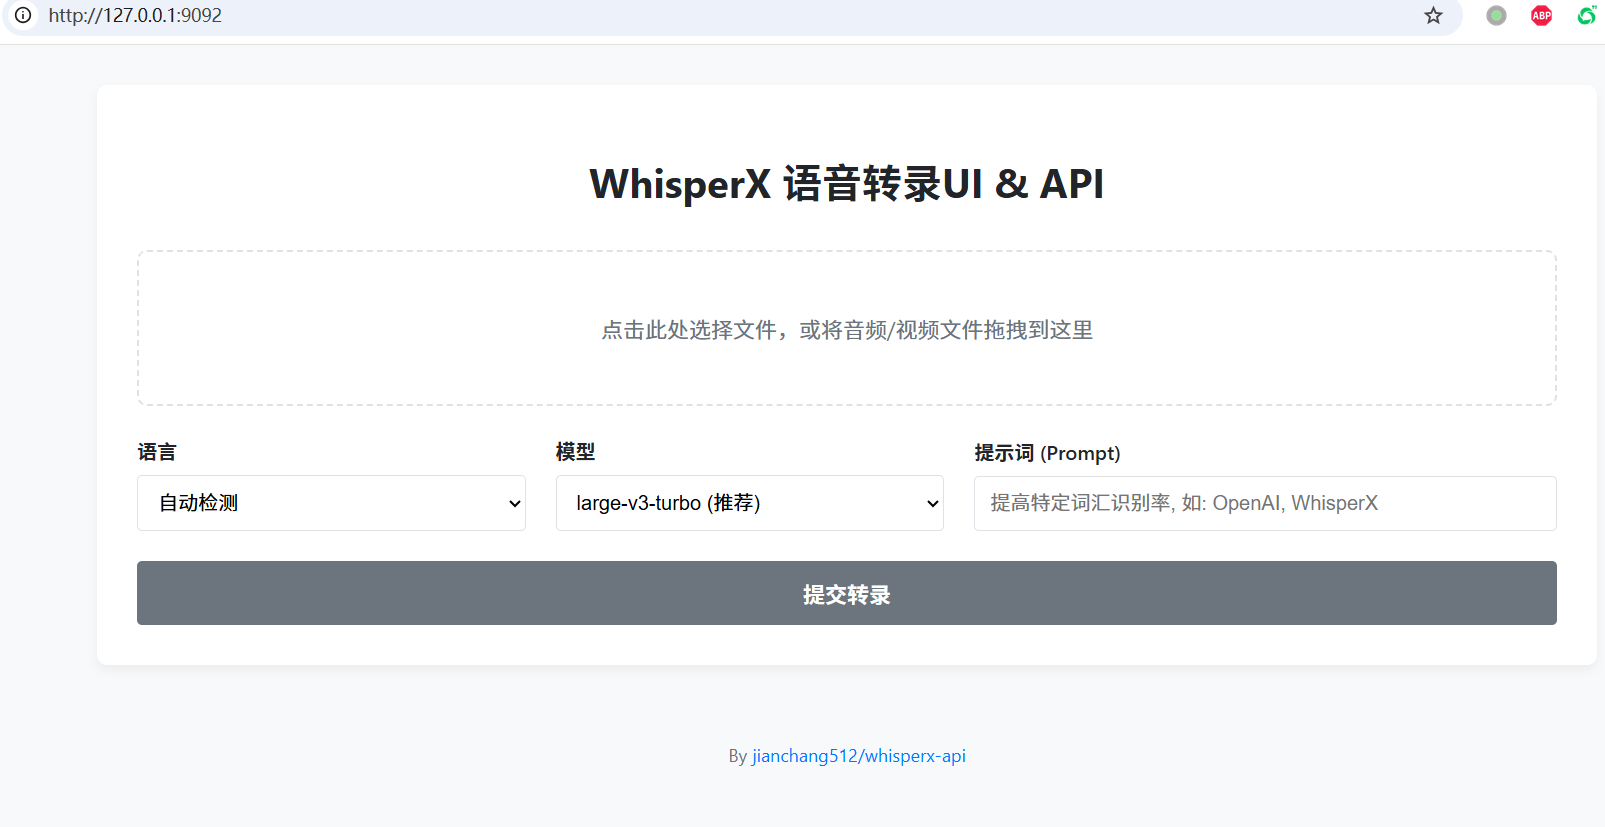
The browser will automatically open: http://127.0.0.1:9092
Enter this address in pyVideoTrans → Menu → Speech Recognition Settings → whisperxAPI window's API address text field.
You'll also see a clean web interface in the browser. If you don't need the browser interface, you can close that page, but do not close the terminal if you need API access.
Using in pyVideoTrans
Configuration Steps
- Ensure
whisperx-apiis running locally (keep the terminal open) - Open
pyVideoTrans - In the menu bar, select Speech Recognition (R) → WhisperX API
- In the configuration window, set the API address to:
http://127.0.0.1:9092 - Click "Save" to start using it
Parameter Reference
| Parameter | Value | Notes |
|---|---|---|
| API address | http://127.0.0.1:9092 | whisperx-api service address; the program auto-appends /v1 |
| api_key | 123456 (any value) | Fixed internally — no need to change |
| max_speakers | -1 / 0 / >0 | -1 = diarization disabled; 0 = unlimited speakers; >0 = max speaker count |
Speaker Diarization Notes
- When enabled, recognition results are automatically labeled with
spk0,spk1, etc. - Speaker information is saved to
speaker.jsonin the cache folder - If only one person is speaking in the audio, no speaker labels will appear
- You need a correctly configured HuggingFace Token and accepted model agreements to use this feature
Common Connection Errors
If pyVideoTrans reports a connection failure, check:
- Is whisperx-api running? — Is the terminal window still open?
- Is the port correct? — Default port is
9092 - API address format — Enter
http://127.0.0.1:9092, do not add/v1(the program appends it automatically)
Usage Methods
Method 1: Web Interface
- Upload a file — Click or drag an audio/video file into the dashed border area
- Set options:
- Language: Select the known language, or "Auto-detect" if unsure
- Model: Larger models are more accurate but slower.
large-v3-turbois recommended. - Prompt: You can enter names, terminology, etc. to improve recognition, e.g.,
OpenAI, WhisperX, PyTorch
- Start transcription — Click "Submit Transcription" and wait for processing
- View and download — Results appear below; you can edit directly and click "Download SRT File" to save
Method 2: API Call
Enter http://127.0.0.1:9092 in pyVideoTrans's whisperxAPI settings.
Optimal Configuration
| Setting | Recommended Value | Notes |
|---|---|---|
| Model | large-v3-turbo | Best balance of accuracy and speed |
| Language | Select known language | Specifying language is more accurate than auto-detect |
| Compute device | GPU (CUDA) | Strongly recommended with NVIDIA GPU |
| max_speakers | Set based on actual situation | Set to actual speaker count for multi-person dialogues; -1 for single speaker |
| Initial prompt | Domain terminology | Improves recognition accuracy for specialized vocabulary |
Common Issues
Q: "FFmpeg not found" on startup?
A: FFmpeg is not installed or not in the system PATH. Re-check the FFmpeg installation steps in the prerequisites.
Q: Transcription button doesn't respond?
A: The first run downloads the model — please wait patiently. If there's an error, check the terminal logs. It's usually caused by an unstable or missing internet connection for model download.
Q: Why are there no [Speaker1], [Speaker2] labels?
A:
- No labels appear when only one person is speaking
- Or your HuggingFace Token is misconfigured or agreements not accepted — re-check Step 2
Q: Processing speed is too slow?
A: If running in CPU mode, slowness is expected. Users with an NVIDIA GPU will see speeds tens of times faster.
Q: Model download failed?
A: Ensure your internet connection is active and stable. If the site is unreachable, you may need to configure proxy settings.
Q: How to switch between different Whisper models?
A: Select from the "Model" dropdown in the web interface. Larger models (e.g., large-v3) are more accurate but slower; smaller models (e.g., tiny, base) are faster but less accurate. large-v3-turbo is recommended.