
User Documentation - Comprehensive Guide
This documentation applies to version
v4.12
Core Features: Video Translation / Speech-To-Text / Text-to-Speech / Translation Srt
- Video Translation: Translates video spoken in Language A into a video with Language B dubbing and Language B subtitles (Left panel: Translation V/A)
- Speech-To-Text / STT: Batch transcribes human speech from audio and video into timestamped SRT subtitle files (Left panel: Speech-To-Text)
- Voice Dubbing / Text-to-Speech: Uses local TTS models or cloud APIs to generate high-quality voiceovers from subtitles or text (Left panel: Text-to-Speech)
- Translate Subtitles: Batch translates SRT subtitle files while preserving timestamps and structure (Left panel: Translation Srt)

Why do different features support different numbers of languages?
Core reason: Supported languages depend entirely on the underlying model or API service you choose. Language coverage varies widely across tools:
- Speech Recognition (STT):
Whisperseries: Broadest coverage, supporting up to 99 global languages.Qwen-ASRand similar LLMs: Focus on high-quality recognition for around 15 mainstream languages.FireRed Chineseand specialized models: Tailored for single-language optimization (Chinese and regional dialects).
- Voice Dubbing (TTS):
Edge-TTS: Powered by Microsoft, supporting over 80 languages and dozens of regional accents.Qwen-TTS: Currently covers around 10 major languages.ZipVoiceand niche cloning models: Focus strictly on Chinese and English.
- Subtitle Translation:
DeepL,Tencent Translate, etc.: Traditional MT engines covering 10–30 common languages with high precision.Large Language Models (LLM): By understanding contextual meaning, LLMs support virtually any recognized human language.
⚠️ Important Notice: Language Selection Guidelines for Video Translation
The language dropdown currently contains about 80 languages. Please follow these rules:
1. Top 20–30 Common Languages (Chinese, English, Japanese, Korean, French, German, Spanish, etc.)
- Best Compatibility: Standard language codes are mapped across all translation providers.
- Recommended Services: Both traditional translation APIs (DeepL, Baidu, Tencent) and AI LLMs (OpenAI, DeepSeek, etc.) run stably.
2. Remaining 50+ Low-Resource / Rare Languages
- Strongly Recommended: Use only "AI Large Language Models" (such as DeepSeek, OpenAI, Gemini) as your translation channel!
- Why avoid traditional APIs for rare languages?
- Lack of provider support: Most traditional translation APIs do not support rare languages.
- Mismatched language codes: Different cloud providers use different ISO language codes for minor languages (e.g., one uses
fil, another usestl). The software does not map codes for all minor languages across all traditional providers; forcing them to run will likely cause immediate errors. - The AI advantage: LLMs understand natural language prompt names directly without relying on strict provider language codes, offering much higher reliability.
  "zh-cn": "Simplified Chinese",
  "zh-tw": "Traditional Chinese",
  "yue": "Cantonese",
  "en": "English",
  "fr": "French",
  "de": "German",
  "ja": "Japanese",
  "ko": "Korean",
  "ru": "Russian",
  "es": "Spanish",
  "th": "Thai",
  "it": "Italian",
  "pt": "Portuguese",
  "vi": "Vietnamese",
  "ar": "Arabic",
  "tr": "Turkish",
  "hi": "Hindi",
  "hu": "Hungarian",
  "uk": "Ukrainian",
  "id": "Indonesian",
  "ms": "Malay",
  "kk": "Kazakh",
  "cs": "Czech",
  "pl": "Polish",
  "nl": "Dutch",
  "sv": "Swedish",
  "he": "Hebrew",
  "bn": "Bengali",
  "fil": "Filipino",
  "bg": "Bulgarian",
  "my": "Burmese",
  "fi": "Finnish",
  "el": "Greek",
  "km": "Khmer",
  "lo": "Lao",
  "nb": "Norwegian (Bokmål)",
  "ro": "Romanian",
  "uz": "Uzbek",
  "pt-br": "Portuguese (Brazilian)",
  "es-419": "Spanish (Latin America)",
  "fa": "Persian",
  "ur": "Urdu",

# For the languages below, it is strongly advised to only use AI channels to prevent provider code mismatch errors:

  "af": "Afrikaans",
  "sq": "Albanian",
  "am": "Amharic",
  "az": "Azerbaijani",
  "bs": "Bosnian",
  "ca": "Catalan",
  "hr": "Croatian",
  "da": "Danish",
  "et": "Estonian",
  "gl": "Galician",
  "ka": "Georgian",
  "gu": "Gujarati",
  "is": "Icelandic",
  "iu": "Inuktitut",
  "ga": "Irish",
  "jv": "Javanese",
  "kn": "Kannada",
  "lv": "Latvian",
  "lt": "Lithuanian",
  "mk": "Macedonian",
  "ml": "Malayalam",
  "mt": "Maltese",
  "mr": "Marathi",
  "mn": "Mongolian",
  "ne": "Nepali",
  "ps": "Pashto",
  "sr": "Serbian",
  "si": "Sinhala",
  "sk": "Slovak",
  "sl": "Slovenian",
  "so": "Somali",
  "su": "Sundanese",
  "sw": "Swahili",
  "ta": "Tamil",
  "te": "Telugu",
  "cy": "Welsh",
  "zu": "Zulu",
"ug": "Uyghur",💡 Quick Rule of Thumb for Beginners:
If translating major languages (Chinese, English, Japanese, Korean, etc.), any channel works fine.
If translating minor or rare languages, always choose an AI Model (like DeepSeek or ChatGPT) for the smoothest results.
1. How the Software Works
The core workflow of Translation V/A takes a video in one language and outputs a new video with dubbing and subtitles in another language:
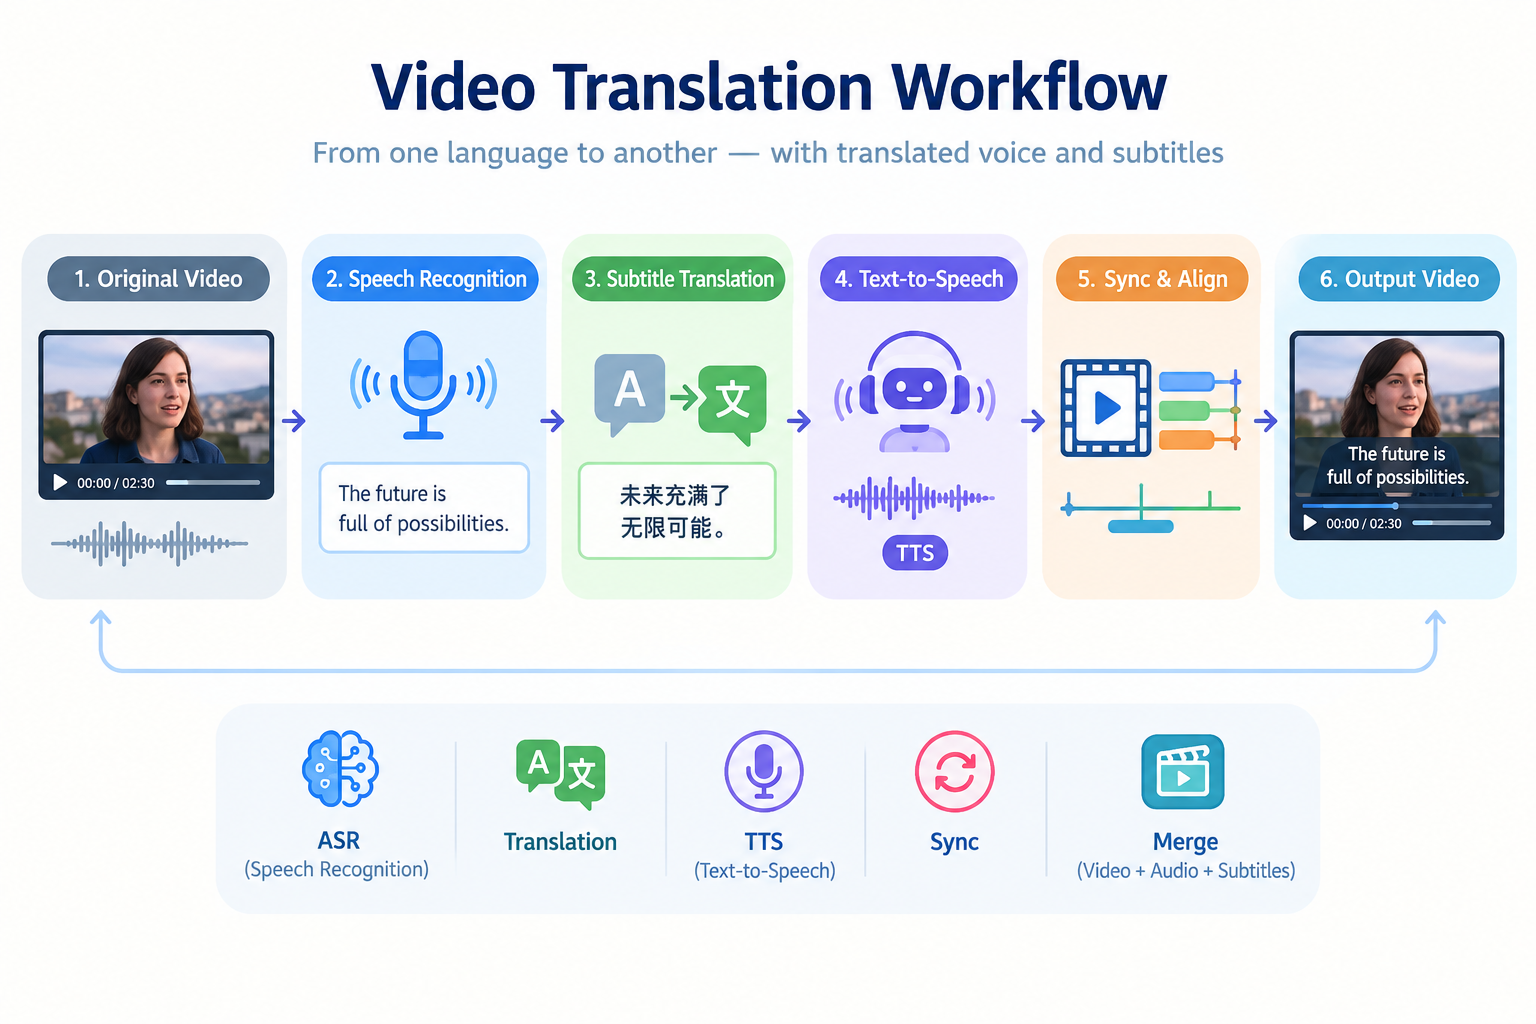
Plain English explanation:
- Speech-To-Text: Like a transcriber, it listens to the original video and writes out timestamped subtitles line by line.
- Subtitle Translation: Translates the transcribed subtitles into your target language.
- Voice Dubbing: Uses TTS engines to read the translated subtitles aloud in your chosen voice.
- Synchronization: Adjusts audio and video timing to align speech with on-screen action, burns in subtitles, and renders the final video.
The whole pipeline is automated—simply configure your settings and click start.
- Supported: Any video or audio file containing audible, intelligible human speech (whether it currently has subtitles or not).
- Not Supported: Videos containing only background music or silent visuals without spoken voice.
- Cannot Remove: Pre-existing burned-in hard subtitles cannot be erased by this software.
2. Download and Installation
Windows Users
- Download the pre-built package: Download Windows Package
- Extract it into a short folder path containing only English letters and numbers (e.g.,
D:\pyVideoTrans). - Double-click
sp.exeto launch. ⚠️ Do not attempt to runsp.exedirectly inside the ZIP archive.
To enable GPU acceleration, make sure you have CUDA 12.8 and cuDNN 9 installed
💡 Beginner Tips & Must-Reads (Avoid 90% of Common Errors)
To ensure the software runs smoothly and to prevent common errors, please take 1 minute to check these three key points before starting:
1. Where should you extract the software?
- ✅ Recommended location: Extract into a simple folder path, such as
D:/videotrans(the shorter the path, the better). - ❌ Never place it here: Do not extract into system-protected directories like
C:/Program FilesorC:/Windows(these folders have strict permission limits, which prevent the software from saving output videos and temporary files).
2. How should you name and store your video files? (Most common error cause!)
- ❌ Avoid long, complex names: Videos downloaded from YouTube, Bilibili, etc., often have extremely long file names containing emojis (e.g., 🔥, 👍, 🌟). Importing these files directly can easily cause system crashes or errors on Windows.
- ✅ Best practice: Before importing, rename the video to a short, simple name (such as
video1.mp4orinterview.mp4, removing all emojis and special symbols), and store it in a simple directory (such as your Desktop or the root of drive D:).
3. Recommended: Enable "File name extensions" (Avoid selecting wrong files)
Windows hides file extensions by default, making it hard to tell apart video, audio, or subtitle files—especially when they share the same name.
- How to enable: Open any folder, click View at the top ➔ check File name extensions
macOS / Linux Installation Guide
Install system dependencies:
bash# macOS brew install libsndfile git brew tap homebrew-ffmpeg/ffmpeg brew install homebrew-ffmpeg/ffmpeg/ffmpeg # Ubuntu/Debian sudo apt-get install ffmpeg libsndfile1-devInstall
uv:bashcurl -LsSf https://astral.sh/uv/install.sh | shClone and run:
bashgit clone https://github.com/jianchang512/pyvideotrans.git cd pyvideotrans uv sync uv run sp.py
View Full Source Code Deployment Guide (macOS/Linux/Windows)
3. Interface Overview

From top to bottom, the main window is structured into these rows:
| Row | Function | Description |
|---|---|---|
| 1 | Select Video/Audio (Required) | Supports MP4, MKV, AVI, MOV, WAV, MP3, etc., with batch queue support |
| 2 | Speech Recognition | Choose STT engine and model to transcribe spoken dialogue into subtitles (Default: faster-whisper / large-v3-turbo) |
| 3 | Translation Subtitles | Choose translation provider, source language, and target language (Default: Google Translate (Free)) |
| 4 | Dubbing (TTS) | Choose TTS provider and voice character to speak the translated text (Default: Edge-TTS (Free)) |
| 5 | Synchronization | Configure Auto Speedup, Slow Video, speech rates, and subtitle style (Default: Auto Speedup) |
| 6 | Start Execution | Click to begin processing tasks |
| 7 | Progress Bar | Displays progress in real time; click upon completion to open the output folder |
| 8 | More Settings | Access noise reduction, vocal separation, BGM re-embedding, and other advanced settings |
What do Free, Local API, and Built-in mean?
- Free: Services like Google Translate, Microsoft Translate, and Edge-TTS run online for free out-of-the-box without registration. Be mindful that heavy, rapid requests may trigger rate limits.
- Built-in (Local): Models that integrate directly into pyVideoTrans without requiring manual external setup, such as VITS, Piper, Qwen3-TTS, OmniVoice, F5-TTS, Qwen-ASR, SuperionTTS, ChatterBox, etc. Note: To keep download sizes small, models are downloaded on-demand when first selected.
- Local API: Open-source models running locally on your own machine. Once deployed and launched, enter their local API or WebUI URL in pyVideoTrans settings (e.g., GPT-SoVITS, CosyVoice).
4. Step-by-Step Video Translation Guide
Step 1: Select Video Files

Click Select Video/Audio in the upper left corner to choose your media files. Supports MP4, MKV, AVI, MOV, WAV, MP3, etc. You can select one or multiple files.
Folder: Check this to automatically batch process all videos found inside a selected folder.Clear Output: Check this if you want to re-translate a video from scratch. When unchecked, the software reuses previously generated SRT transcriptions or translations to save time.Save To...: Click to specify a custom destination directory for the translated videos.Output MP4 Only: When enabled, intermediate files (audio clips, SRT files) are cleaned up, leaving only the final translated MP4 file.Auto Shutdown: Automatically powers off your computer when all batch jobs finish.
Default Output Directory Behavior
When
Folderis unchecked: Files are saved to a_video_outfolder created alongside your source video. For example, if your file isD:/videos/001.mp4, the result is saved inD:/videos/_video_out/001-mp4/.When
Folderis checked: Files are saved in_video_out/{FolderName}next to your folder. If your folder isD:/videos/test, output will be stored inD:/videos/_video_out/test/001-mp4/.
If you specify a custom folder with Save To..., outputs will always go to your chosen location.
Step 2: Choose Speech Recognition Engine
This step transcribes spoken audio into text, directly establishing subtitle and translation accuracy.

| Service | Recommended Use | Notes |
|---|---|---|
faster-whisper (Local) | Recommended default; tiny is fastest, large-v3 is most accurate | Fast and high quality |
openai-whisper (Local) | High-precision requirements | High accuracy, slightly slower |
Qwen-ASR (Local) | Chinese and ~15 major languages | Excellent Chinese accuracy, slower |
Nemotron-3.5-asr-0.6b (Local) | European languages, Japanese, Korean, Vietnamese, etc. (40 languages) | Open-source model from NVIDIA |
Moss-Diarize (Local) | Chinese and ~15 major languages | Supports speaker diarization for media under 90 minutes |
Whisper.cpp (Win Built-in) | Built into Windows packages; needs manual setup on macOS/Linux | Lightweight C++ Whisper port |
Alibaba FunASR (Local) | Great for Chinese; offers paraformer, sensevoice, Fun-ASR-Nano models | Strong domestic performance |
FireRed Chinese (Local) | Chinese speech and regional dialects | Open-sourced by Xiaohongshu |
Dolphin Asian (Local) | East Asian, Southeast Asian, and Middle Eastern languages | Dedicated to Asian languages |
Omnilingual (Local) | Covers widespread global languages | Facebook open-source; broad coverage |
Choosing between faster-whisper and openai-whisper models
tiny→ Fastest speed, lowest accuracybase/small→ Good balance for quick draftsmedium→ Solid, dependable performancelarge-v3→ Highest accuracy, requires 8GB+ VRAMlarge-v3-turbo→ Recommended balance of speed and high accuracytiny.en / base.en / small.en / medium.en / distil-large-v3 / distil-large-v3.5→ Distilled models optimized strictly for English audio
Explicitly specify the Spoken language; use [Auto Detect] with care
Selecting the correct spoken language ensures significantly higher transcription accuracy.
Starting with v4.12, Auto Detect is available at the bottom of the Spoken dropdown for unknown sources. If you use Auto Detect:
- Only use
faster-whisper (Local),openai-whisper (Local), orQwen-ASR (Local). Other engines require a specified language. - When using
Google Translate (Free)orMicrosoft Translate (Free), mixed-language inputs may not be translated unless the source language is explicitly chosen. - Avoid bilingual subtitles when using auto-detection.
SecondarySTT and LLM Correction

- SecondarySTT: When a dubbing voice is selected and bilingual subtitles are not enabled, you can check
SecondarySTT. After dubbing is finished, the software re-transcribes the newly synthesized speech to generate precise, compact subtitles tightly locked to the new voiceover.
In Advanced Options -> ASR Settings, lowering the maximum and minimum speech duration values helps yield concise subtitles.
Note: SecondarySTT uses faster-whisper (defaulting to large-v3-turbo), which can be changed in this section.
- LLM Correction: Speech recognition can occasionally introduce phonetic typos or missing punctuation. LLM Correction sends the transcript to an AI LLM to fix errors and restore punctuation for natural phrasing. It defaults to
DeepSeekand can be switched under Tools -> Options -> Advanced Options -> General -> AI provider for LLM Correction errors.
The prompt file is stored in videotrans/prompts/resegment/llm.txt for custom adjustments.
Adjust Subtitle Length and Segmentation (Fix Run-on or Broken Subtitles)
Different videos feature different speaking speeds, pause patterns, and background sounds. By default, sentences might sometimes be segmented too short (one word per line) or too long (walls of text). You can tweak the segmentation rules to suit your video.
Default setting: Subtitle duration usually runs between 5–8 seconds, with a minimum duration of 3 seconds.
📍 Settings Location
Open the top menu: Tools / Options (&T) -> Advanced Options -> locate ASR Settings.
1. Core Parameter Breakdown
| Parameter | Unit & Default | Purpose |
|---|---|---|
| Max Speech Duration (sec) | Seconds (s) Default: 5 | The maximum target duration for a single subtitle line. Setting it to 5 aims for lines under 5 seconds. To avoid cutting off mid-word, a 1.5x buffer is applied (actual max: ~7.5–8s). 👉 Lower this value (e.g., 3–4) for shorter lines. |
| Min Speech Duration (ms) | Milliseconds (ms) Default: 3000(1000ms = 1s) | The minimum duration floor (prevents fragmented subtitles). Lines under this length merge into adjacent sentences. 👉 Lower this (e.g., 1000–1500) if you want short phrases like "OK" or "Thank you" on their own lines. |
| Silence Split Threshold (ms) | Milliseconds (ms) Default: 600 | Silence duration required to trigger a sentence break. A pause longer than 600ms ends the line and starts a new one. 👉 Raise this (800ms+) for longer, continuous sentences; lower this (200–400ms) for snappy, rapid cuts. |
2. Recommended Presets
🎬 Preset A: Short-form Video / Fast Commentary (Snappy & Punchy)
- Max Speech Duration:
2or3seconds - Min Speech Duration:
1000ms (1s) - Silence Split Threshold:
300ms - Result: Fast, concise subtitles suitable for TikTok, Reels, and fast-paced voiceovers.
- Max Speech Duration:
🎙️ Preset B: Lectures / Documentaries / Interviews (Complete & Structured)
- Max Speech Duration:
8or10seconds - Min Speech Duration:
3500ms (3.5s) - Silence Split Threshold:
800ms - Result: Complete, coherent sentences suitable for slower speaking rates.
- Max Speech Duration:
⚠️ Important Notice
- Duration Logic:
Max Speech Duration (sec) × 1000must be greater thanMin Speech Duration (ms). Setting Max to 2s (2000ms) and Min to 3000ms will cause segmentation conflicts. - Voice Cloning Rule: When using voice cloning (
clonevoice), keep Min Speech Duration at or above3000ms. Clips shorter than 3 seconds do not provide enough acoustic data for the AI to extract voice timbre, resulting in distorted or failed dubbing.
Advanced: SecondarySTT Parameters (Dubbed Audio Only)
When SecondarySTT is checked, the software re-transcribes the freshly generated dubbing audio. Because synthesized speech is clear and consistent, tighter thresholds work well:
- Recognition(2): max duration(s): Default
1.5. Recommended:1.0 ~ 2.0s for compact pacing. - Recognition(2): min duration(ms): Default
600. Recommended:400 ~ 600ms to capture brief utterances.
Step 3: Choose Translation Service

| Service | Description |
|---|---|
Google Translate (Free) | Default; Decent quality, requires proxy in restricted regions |
| DeepSeek | High-quality LLM translation at very affordable pricing (Recommended) |
Hy-MT2 (Local) | Tencent Hunyuan translation model |
M2M100 (Local) | Fully offline local translation |
Microsoft Translate (Free) | Free translation without proxy; subject to rate limits |
Select the Spoken language (original audio language) and Target language (desired translation output).
Glossary: When using AI channels, custom glossary terms are injected into the prompt. Click the glossary button and enter terms line by line in the format:
Source Term=Target Term(e.g.,CEO=Chief Executive Officer).
Key Settings for Superior Translation Quality
- When using AI translation, set
AI translation batch size (lines)to 100 or higher with a long-context model. - Check
Send full SRT format for AI translation(SendSRT) for context-aware translations. - Check
Advanced Options -> AI translation includes all original subtitles for reference?to provide full original text as reference context for the best quality (available from v4.12).
Step 4: Choose Dubbing (TTS) Service
Generates speech for your translated subtitles.

| Service | Description |
|---|---|
Edge-TTS (Free) | Recommended Default; Natural voice quality, supports all built-in languages |
Qwen3-TTS (Local) | High quality, supports voice cloning, ~10+ languages |
F5-TTS (Local) | Supports Chinese, English, French, German, Japanese, Korean, etc., with voice cloning |
OmniVoice (Local) | Broad language support with voice cloning |
Confucius (Local) | Supports 14 languages including Chinese and English, with voice cloning |
ChatterBox (Local) | Strong European language performance, supports voice cloning |
ZipVoice ZH/EN (Local) | Fast Chinese/English dubbing with voice cloning |
Moss-TTS-Nano (Local) | Multilingual support with voice cloning |
Higgs-audio-v3 (Local) | High quality multilingual cloning; needs 10GB+ VRAM or 20GB+ RAM on CPU |
gTTS (Free) | Google TTS service; supports all built-in languages |
After selecting an engine, pick a voice actor in the Voices dropdown.
Selecting clone will clone the speaker's original voice from the video. Make sure Min Speech Duration (ms) is set to at least 3000ms when cloning.

Step 5: Audio, Subtitle, and Video Synchronization
Translating text changes sentence length, syllable count, and speaking duration. Proper synchronization aligns these elements cleanly.

| Option | Default | Description |
|---|---|---|
| Auto Speedup | ✅ Enabled | Speeds up dubbed audio if it is longer than the original scene |
| Slow Video | ☐ Disabled | Slows down video footage to accommodate longer dubbed audio |
| Subtitle Embedding | Soft Subtitles | Embedding method (choose Hard Subtitles for web playback compatibility) |
Subtitle Modes:
- No Subtitles: Replaces audio only; no subtitle tracks added.
- Hard Subtitles: Subtitles are permanently burned into the video image (compatible with all web and social players).
- Soft Subtitles: Subtitles are saved as a toggleable stream inside the video container (supported in media players, not web browsers).
- Hard Subtitles (Bilingual): Displays source and target subtitles together burned into the video (disables SecondarySTT).
- Soft Subtitles (Bilingual): Toggleable bilingual subtitle track in media players (disables SecondarySTT).
Step 6: Start Execution

Click the Start Execution button. The bottom progress bar will display real-time updates. When finished, click the bar to open the output directory. 
Enable CUDA?: If your computer is equipped with an NVIDIA GPU and has CUDA 12.8 + cuDNN 9 configured, enable this option to accelerate speech recognition substantially.
Single-Video Mode: When translating one video at a time, interactive proofreading pop-ups will appear allowing you to fine-tune subtitles and re-dub segments on the fly. Learn more about Single-Video Mode.
5. More Settings
Access noise reduction, background audio preservation, speaker separation, speech speed, and volume controls by clicking More....

Click More... to expand:
| Setting | Description |
|---|---|
| Noise Reduction | Cleans background hiss and noise to improve STT transcription accuracy |
| Default Punct / Restore Punct / Remove Punct | Choose Remove Punct to strip punctuation, or Restore Punct to reconstruct missing punctuation marks |
| Separate Vocal/BGM | Isolates human dialogue from background music for cleaner transcription |
| Re-embed BGM | Re-mixes original background audio back into the final video after dubbing |
| BGM Volume | Adjust background audio volume multiplier (0.0 – 2.0) |
| Speed+% | Speed up or slow down dubbing speech playback (-50% to +100%) |
| Volume+% | Adjust dubbing volume (-95% to +200%) |
| Pitch+ | Adjust dubbing pitch (-100Hz to +100Hz) |
6. Lossless Video Export
To export the final video without re-encoding the video stream (preserving 100% original picture quality), ensure all of the following:
- The source video is an MP4 file encoded in H.264 (libx264).
- Slow Video is unchecked.
- Subtitle style is set to No Subtitles, Soft Subtitles, or Soft Subtitles (Bilingual).
- Under Advanced Options,
H.264/H.265 encodingis set to264.
7. Advanced Options Reference
Access through Tools / Options (&T) -> Advanced Options:

Click here for the complete guide to Advanced Options
8. Frequently Asked Questions (FAQ)
Q: Can I run multiple instances of sp.exe at the same time?
Technically yes, but it is not recommended. Different instances share the same tmp folder; closing one instance will clear temporary files and likely crash tasks running in the other instance.
If you need parallel runs, copy the software folder to a new location (e.g., D:/videotrans1 and D:/videotrans2) and run each sp.exe independently.
Q: Why is processing running slowly?
- Check if GPU acceleration (CUDA) is enabled.
- Use smaller, faster models (e.g.,
large-v3-turboorsmall). - Update your NVIDIA graphics card drivers.
Q: Why are transcription results inaccurate?
- Ensure the
Spokenlanguage matches the dialogue in the video. - Upgrade to a larger model (e.g.,
large-v3). - Turn on
Noise Reduction. - Adjust the
VAD: Speech probability threshold.
Q: Why are subtitles, audio, and video out of sync?
Different languages require different amounts of time to speak the same sentence. To fix alignment:
- Enable
Auto Speedup(enabled by default). - Enable
Slow Videoas an additional measure. - Increase
Speed+%to speed up the dubbing pace overall.
Q: Why is the exported video file size too large?
- Increase the
Video output quality control (CRF)value (e.g., to 25–30). - Change the video encoder setting from 264 to 265.
- Disable
Slow Video.
Q: How do I enable GPU acceleration?
Verify your system has compatible NVIDIA drivers, CUDA 12.8, and cuDNN 9.x installed, then check Enable CUDA? on the main window. AMD graphics cards do not support CUDA acceleration.
Q: What are the conditions for lossless export?
The original video must be H.264 MP4, Slow Video unchecked, subtitle mode set to No Subtitles or Soft Subtitles, and codec set to 264.
Q: Can this software remove hardcoded subtitles?
This software cannot extract or erase pre-existing hardcoded subtitles.
- To extract hard subtitles, use dedicated OCR tools such as Offline Hard Subtitle Extractor or video-subtitle-extractor.
- To erase hard subtitles from video frames, try open-source tools like video-subtitle-remover.
Related Documentation
- Improving AI Subtitle Translation Quality — Comparison of translation modes and glossary setup
- Best Practices for Local LLM Translation — Local LLM configuration guide
- Customizing AI Translation Prompts — Custom translation prompt instructions
- Recommended Best Settings for Video Translation — Optimal configurations for every stage
- Troubleshooting Blank Subtitle Lines